FROM THE BARN TO THE STREET - PART 1
I figured I would document my '32 Coupe's journey from forgotten barn decor to street terror.
The longer story of how this car was located and how the deal itself went down can be found here: BETTER LUCKY THAN GOOD – ironandsteele but the abbreviated version is that I found an ad on Craigslist of all places for a 1932 Ford 3 Window Coupe, all in pieces and local to me. This is a relatively anomalous thing, at least around here. You really don't see a lot of that type of car pop up for sale to the masses in the PNW. I was one of the first to reply, but the path wasn't quite so simple.. You'll have to read the story to get the full picture. But the point is, I was eventually able to load it up and bring it home.
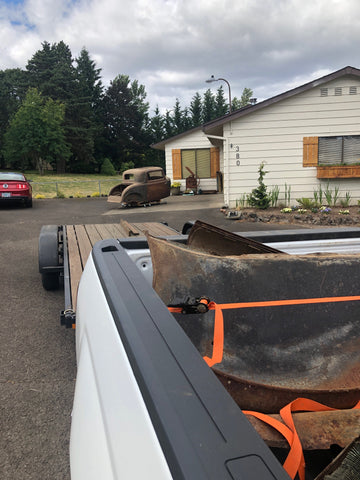
Here is what it looked like when I grabbed it from the son of the gentleman who'd owned it for more than 60 years, all of that time it had been stored in the rafters of a barn in rural Oregon, rumor has it, next to another one in similar condition. When I came into the picture though, the barn and all of the other cars were long-gone/sold off and this was the last one the family had. The son had removed it from the barn, took it home in the hopes he would get to it one day, but had come to the realization that that was becoming less and less likely.


It was of course in many pieces, but was mostly complete and came with a LOT of extra parts. This would come in handy for me later, as I could sell off the extras to help recoup some of the money I spent to buy the thing in the first place. I talk about this practice a lot: Get Some Patience Now - The Iron and Steele podcast | Podcast on Spotify
By the time it was all said and done, I left with the body and all the key pieces (garnish moldings, dash, grill shell, etc.) frame, front and rear ends, fenders, running boards, and TONS of boxes of smaller items and trinkets. There were multiples of a lot of things, like front axles, glovebox doors/ashtrays, arm rests and lots of other "easy to peddle" items. The only bigger things I was lacking were the seat and the decklid, the latter of which was apparently stolen at some point in history when someone broke into the barn and helped themselves.


This was not a planned purchase, so by the time I got home, I had already made the decision to let go of a Model A Coupe that I had big plans for. Not an easy choice, as this was a really nice car...


I should also mention that during this exact time period, we had just moved, and I was in the process of getting the new place dialed in enough to even be able to store my cars, let alone work on them. I was also remodeling a house so I could get it rented out AND trying to sell off another one. Needless to say, I felt like I was absolutely sprinting 24/7. What's one more iron in the fire, right? Well, sort of... But, I was going to need some help. A lot of it...
The first order of business was to sort through the parts and pieces that came with the car and figure out what was needed and what could be sold off. In the end, I basically sold almost everything other than the body itself and the frame. Eventually the decision was made to sell the frame as well, in favor of a brand new one. More on that later.

I knew I wanted this car to have a fairly aggressive chop. Not exactly a Bonneville chop, but still pretty squashed. I have had plenty of chopped cars and usually subscribe to the “more is more” line of thinking, but in this case, I wanted to make sure the proportions were just right. In my opinion, these 3 window coupes can start to look goofy with too much out of them. I didn’t want a cartoon, just an aggressive hot rod with proportions that complimented the body. The best example I could find was the Lloyd Bakan Coupe.

In my travels I encountered some photos of a coupe chopped by Mark Codd and it was exactly what I was looking for. I messaged him asking a few questions about it and luckily he was very accommodating and forthcoming with the details of how he had accomplished it. And to my surprise, it was actually pretty straight forward…
Here’s the thing: I’m not a professional hot rod builder or metal fabricator. I have chopped a couple of Model A’s and can clunk my way through it and end up with an acceptable job. Model A’s don’t scare me, the stakes are fairly low is how I look at it. With this car though, I chickened out and enlisted the help of a friend who happens to be everything I’m not when it comes to fabrication: a true professional, Rob Benko.
So, it went back on the trailer to be carted off to Vancouver, Washington and transformed into the foundation of a mean looking hot rod.

I won’t bore you with too many details, I’ll just post some photos I took through the process. For those wondering about the details, it is basically a 4” straight chop, pillars leaned back. Very straightforward.


No turning back now!


Somewhere along the way, we ran into a snag with the B pillar wood. What looked “solid enough” in reality ended up being junk once we started picking at it.

I started looking for replacement wood and found that it simply wasn't available quickly. Everyone that made a kit or sold individual pieces was apparently several (7+) weeks out. Meanwhile my car was taking up space in my friend’s shop, so I had to do something. I started buying what I could find used here and there. Any bits and pieces, whatever I could find. In the end, I wound up with one usable passenger side, but nothing for the driver side.
I ended up finding a local woodworker who unbelievably made a driver side B pillar for me by using the passenger side as a pattern and making a mirror image…… yeah… I got a quick lesson in how much shape and how many things are actually going on in what looks like a simple stick of wood. It was a crazy process but i had no other choice and amazingly, it came out perfectly.

We got the wood handled and show went on. Here are some more photos of that process. All credit to Rob:


I remember staring at this and saying "fuck" a lot. What a look! All credit to Rob Benko.

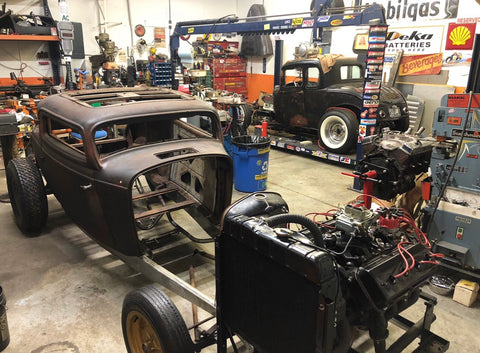
While the body was being chopped, I was gathering parts to put a car together.
I had initially intended to use the stock frame. After I got the body back from Rob, I started mocking it up with the stance I wanted and different wheel/ tire combos. I wanted it low. But I also wanted it to have some rake. I spent a lot of time in the shop looking at the stance and the amount of work it was going to take to make it not just sit low, but also function. I had some questions about how that was all going to happen in the real world.


After a lot of staring and adjusting, I called my friend, Darryl Schroeder over to have a look at what I was thinking.
For those that don't know Darryl, he is a wildly talented hot rod builder, fabricator and all-around good guy who owns a shop here in my area called Schroeder's Speed and Custom, where he and his team build high-end hot rod and custom cars. The amount of knowledge and talent this guy has is staggering and more than a few times he has helped to set me straight on problems that would have me scratching my head for hours, often with just a quick phone call.
Darryl builds a lot of frames and sets up lots of suspension systems, so I knew he would be the best person to run my questions by. My main question was "how do I get it this low, but still have this rake - and still be drivable?" since the mock ups had the front frame horns almost sitting on the ground... basically, what is the best route to being able to have my cake and eat it too?
After a little back and forth, explaining the plan for the drivetrain, the stance and the look I wanted, Darryl gave me his opinion on how to make the car low, raked, and drivable. It was:
-sweep the frame 2" in the front
-install a Model A front crossmember and move it forward 2"
-install a '40 style rear crossmember
-put a small notch in the rear kick up
-fully box the frame
And lastly, he proposed, "If you're really going to do all of that, let's just build a new frame."
This wasn't something I had initially considered, since the stock frame I had was nice and just in general, I would rather use original parts whenever possible. But in the end, he had a point. If I wanted it to do and look like everything I explained, we should just start from scratch. So, that's what we did. Darryl built a new frame, fully boxed, swept to spec, new crossmembers as described above, notched, and a tube center crossmember/trans mount for ease of operation. "Nobody is going to see anything under it, it's an inch off the ground. If you want it to drive as nice as it sits, trust me."
He was right.

On the subject of the drivetrain... This was something I went back and forth with a lot. My plan for this car was to have a foolproof driver that I could hop in and drive to Bonneville. I wanted it to handle well, drive well, be fast enough to keep up with modern-car freeway traffic and do everything as well as it possibly could.
Initially, I planned to use a nice 283 I had laying around with a Weiand WC4D and four 97's, matching valve covers and full-period dress to kind of give it the look. That, mated to a Muncie and an Olds rear end I figured would be the perfect mixture of reliability and period theme. As the project went along though, I started to get less and less enthusiastic about a basic SBC in a car that was otherwise pretty cool.
I toyed around with the idea of an Olds, Buick Nailhead, or even a Hemi, if I could find a decent deal on the right one.
All the while, the car sort of just sat in the corner of my shop and waited...

There was also a brief moment in time where I pretty seriously considered doing the exact opposite of everything I listed above and instead steal literally everything off of the altered I owned at the time, injected 327, tube axle, spindle mounts, 'chute and all.. It almost happened!

(I didn't build this car, Mike Thompson put it together, which is why it looks so killer.. I just owned it for a brief period around this time.)

Instead though, I moved ahead with my plan of having a nice driving car and continued gathering parts. I was still going back and forth on the motor itself, but I did get my hands on a Muncie and Olds rear end and went through both of them.
I also got the idea that it needed to run Magnesium wheels, so I started searching around for a good set of big window Halibrands and was lucky enough to find a set through a friend. They were 15x7 and 15x4, matching single pattern and in very nice condition. Once I got them home though, I realized that they actually had a slightly different sheen to them and didn't match perfectly front to back. The rears also had been polished at one time and then had flashed over in a way that almost made them look like they had a grey coating on them of some kind. I tried a few things to correct this, but nothing short of sticking them in a blast cabinet was going to get rid of the sheen. So, I eventually bit the bullet and blasted the entire set, undoing decades of aging and darkening, but I had to start over. Here is what they looked like after that:

They came out very nicely, but were very silver looking. I wondered how long it would take for them to turn dark again, but luckily after some Gibbs and a little bit of time, they turned pretty quickly. It has been about a year and a half since I blasted them and as you will see later in this thread, they are now a very nice, dark color again and match each other, and the car perfectly.
So, at this point, even though I wasn't entirely sure what the motor would end up being, I did have enough to at least make a roller out of it. I went ahead and got the front and rear ends in place while I pondered my options. Getting it to roll was a huge step and big motivator.

Spindle mounts just for mockup/ease at the time:

Front bones tacked in place and radiator/shell set on for a quick visual:

I was pretty specific about where I wanted the tire to land in relation to the wheel well opening, so that took a lot of playing around. I think I had the rear end in and out, and the leaf pack apart a half dozen times adding and subtracting to adjust the height.
I got the backing plates and drums on and mounted my front wheels/tires and pushed it outside to get a full idea of what was what. So far I was liking it and I knew the front would go down quite a bit with the motor and everything else in it:


Speaking of the motor.... I finally made a decision on that too. Did you spot it??
If not, here is a little more obvious hint:

Here's how this came about: One day we were working on my friend Robbie's coupe (in the background of at least one of those photos) and we had just fired his motor for the first time. We were riding high on the fact that we heard it run for the first time and all that. So, I pointed to the corner and said "Have you even fired that one?"
"That one" was a 1955 270 Dodge Red Ram Hemi. Robbie had just purchased it from the estate of a local Hemi builder/guru after he had passed away. It was on a run stand, completely rebuilt top to bottom with all of the best of the best and ready to go. The builder had put it together, broke it in on the run stand, and then passed away shortly after.
Robbie said he hadn't heard it run yet and so, still high from listening to the Olds motor in his car rumble to life, we grabbed a battery and some fuel and rolled the engine stand outside. A few seconds later, that little Hemi was doing some rumbling of its own.. It sounded AMAZING. We were still waiting on the build sheet from the son of the previous owner, but just listening to it you could tell it was cammed up and had some serious compression. As soon as we shut it off, I said, "Well, how much is this fucking thing going to cost me?" I had to have it. And that was that.

I got the motor and transmission mocked up in the position I wanted it and this is where things started to really move along. At this point, I was shuffling the car around between my shop, to Robbie's and Darryl's. Some of the more involved things that took a bigger brain than mine happened at Darryl's place with him being nice enough to let me bring my car to his facility on the weekends and work on it with me when he had the spare time.
Having access to a place like this was a real game changer. Darryl's shop is fully-equipped with every piece of machinery you could ever imagine. Something that would take me two and a half hours at home to make with hand tools on the floor of my cold shop takes five minutes here. Between the tools and the knowledge and skill that Darryl has, things really starting flying.
Some of these photos will be out of order I'm sure, but here are some highlights:


What's really amazing is how many times these cars have to come apart and go back together throughout the process. I don't remember how many times we had the body off and on, but it was a few.

Over the course of a couple of months of weekends and evenings, it started to really come together. And I'm jumping way ahead and likely out of order with some of these, but the point is, it started to turn into a car:

PART 2 NEXT WEEK! MAKE SURE YOU'RE SUBSCRIBED!
1 comment
Good read and look into your aesthetic. Very nice frame. I really like the motor mounts.